People in IT security will most likely need to work and test with different operating systems, versions and software. Nowadays this is a piece of cake, because thanks to virtualization you can run a whole network of computers virtually on your single one laptop. Nevertheless, when setting up such a lab, you should take care to properly set the networking scheme according to your needs.
I see that especially people who are new to working with virtual labs have questions on why their network is not working, why their VMs sometimes have internet access and sometimes not, or why their host system cannot see traffic from the hosted VMs (Virtual Machines). Therefore I wanted to quickly explain the different networking schemes available in VirtualBox and how they work. Many people will know VMware Player/Workstation as hypervisor solution to host virtual machines, but some special features aside, I think VirtualBox is on par and moreover it is free and open source. What’s not to like.
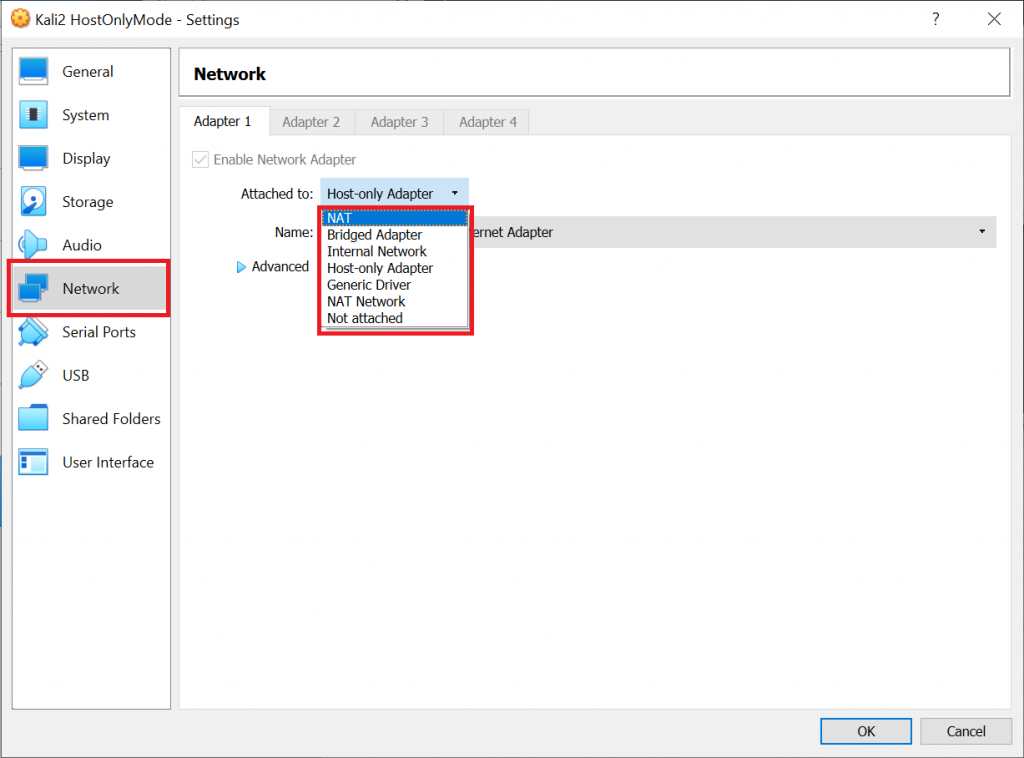
When you set up a new VM, you need to decide on the networking scheme. This will have an impact on the functionality of the VM, for example: Will the VM have access to the internet or not, will it be reachable for other systems in the network or even the internet, will it be able to communicate with other VMs on that computer, will the host computer itself be able to communicate with the VM, etc.
The networking scheme also has security implications, because if you are running an old and vulnerable operating system for local testing (or something like Metasploitable) you might not want it to be reachable from anywhere outside your computer. Let’s see which options you can choose from in VirtualBox:
There is not “the best” scheme for your VM. At the end of the day it depends on what you want to achieve. For example, if you want to perform local testing, if you want to capture packets, if you want to provide services to the network, etc. In the following I will discuss some of the details you should consider when building up your lab – from a security and from a functionality standpoint – so that you can decide on scheme that is right for you.
Please note that for the sake of clarification I’m using Wireshark to capture packets on the host and the VMs. We should keep in mind that capturing directly on a system is error-prone, because it might considerably differ from what’s actually on the wire. You will also see another “not-best-practice”: I will be using Kali with my root account and capture packets, which – even in a VM – I strongly discourage you from doing in an uncontrolled environment. Wireshark is handling a lot of unknown and potentially dangerous data, so we should refrain from giving it admin rights whenever possible.
Ok, enough for the disclaimer, let’s get started.
NAT (Network Address Translation) – For internet only
Use it when: VM only needs to communicate with external network and your host, but no other VMs. Not useful for (penetration) tests between VMs.
This is the default option for new VMs – for a good reason. NAT offers a good balance between network availability and security. Just as with any NAT device (virtual or not), the system will not be directly reachable from outside your network, because when packets enter the network, the address will be translated to a local one by VirtualBox. At the same time, it does allow you to access systems outside your network. So, if the host system your VM is running on has internet access, so will your VM. This is very convenient to download packets into the VM, etc.
The address translation happens in the VirtualBox adapter, i.e. the VM host basically acts as a router (layer 3). Note that each VM is getting its on virtual network. This means, even if you start several VMs at the same time, if they are all on “NAT” mode, they might well have the same IP address. Let’s visualize this in our lab: We will be starting up 2 VMs in NAT mode and also have a look at our host system:
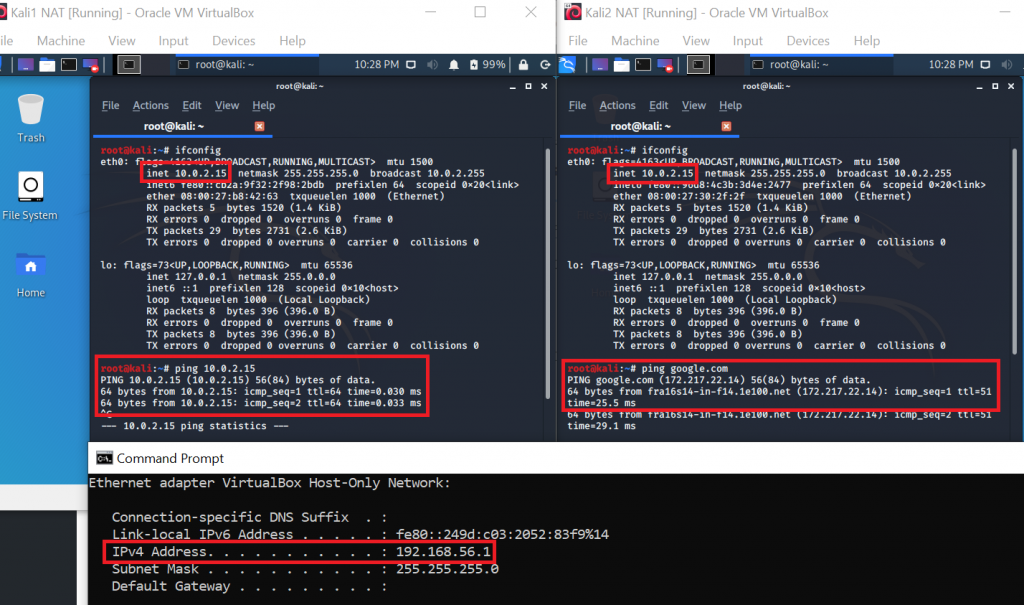
On the left side you see that our first VM has the IP 10.0.2.15. On the right side you see that our second VM has the IP 10.0.2.15. They are the same! However, as I said before, this is not an issue, because for VirtualBox the two VMs are in totally separated networks. Keep in mind though that it also means that VMs will not be able to communicate among each other. As you can see at the bottom of the screenshot, our host system (Windows) is yet on another network: 192.168.56.1 for the VirtualBox Host-Only adapter and 192.168.178.22 (not in the screenshot) for the WiFi adapter.
How about intercommunication?
As you can see in the first VM, pinging the IP of the second VM works – but this is of course a pitfall, because they both have the same IP address. So, what you are actually doing there is pinging your localhost. There is no way how the two VMs can directly communicate with each other. From a security standpoint this is of course good, but if you want to perform penetration tests from one VM to the other, you will need to use another networking scheme.
From the second VM you can see that internet access works (because our host machine has internet access). To other systems, your VM’s traffic will just look like the one coming directly from your host (i.e. same MAC address and IP) This can also be useful if the network you want to connect to is limited to certain MAC addresses.
What is further visible: Our VM can ping our host (192.168.56.1 or 192.168.178.22):
Communication from our host to the VM however does not work (unless you use port forwarding for NAT). In the screenshot below you can see that pinging from our host (192.168.178.22) to the VM (10.0.2.15) results lets our ICMP requests end up in nirvana – or as Wireshark says: “no response found!”.

Especially if you install your lab environment on a laptop and therefore might connect to open or insecure public networks, working with a NATed VM provides a bit of extra security, because other systems in that public network will not be able to directly establish connections with your VM. At the same time, things you can do in your NATed lab are of course also limited. For example, if you create a lot of connections and traffic in your VM – let’s say during a port scan – the performance of VirtualBox’s NAT engine might get into trouble. Therefore, let’s have a look at a more flexible option next.
Bridged Adapter – For full access
Use it when: You need full access between VMs, to external networks and between host and VMs in both directions, for example for tests between VMs and the host and if you have services that need to be accessible from outside (e.g. a web server in your VM that shall be accessed from the host or even the internet). You want to sniff traffic from all VMs at once. Use with caution!
Working with a bridged adapter is the most “accessible” option: “Anything goes”. All components can talk to each other, so if you are running an Apache web server in your VM, the host system will be able to browse the provided websites. With proper configuration of your router, or if you are in a public network (school, uni, coffee shop) it will even be accessible from the internet. This obviously can be a security threat, especially if you expose powerful systems to the outside world like for example a fully loaded hacking toolbox in a Kali linux.
When you switch to “Bridged Adapter”, VirtualBox will let you choose between the physical network adapters your system provides. In other words, you will be connecting on the same layer 2 network as the host machine – the interface will simply be listening and responding for several MAC addresses at once (for your host system and all bridged VMs). This is very useful if you want to sniff all traffic for all VMs at one central point, as it basically sets the interface to something like a “promiscuous mode light” (if your adapter does not support promiscuous mode, VirtualBox will switch MAC addresses “on-demand” to make this possible).
You can see in the screenshot below, that now both VMs and the host are in the same network 192.168.178.0/24:
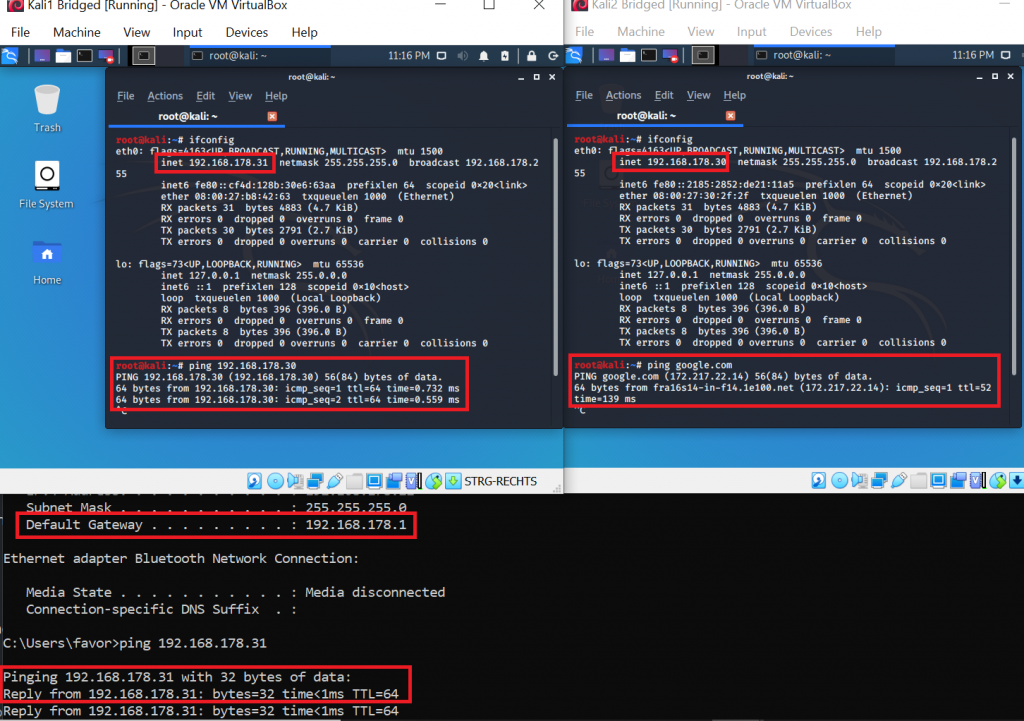
As I said: Bridged mode brings full connectivity. In the screenshot above, VM1 (192.168.178.31) is successfully pinging VM 2 (192.168.178.30). This was not possible in NAT mode. VM 2 is successfully pinging google.com. That was already possible in NAT mode, but now the connection to the outside world will not appear anymore as if it was coming from our host system, but really directly from the VM. Our host (192.168.178.22) is successfully pinging VM 1 (192.168.178.31). This was also not possible in NAT mode. Furthermore, your VMs – just as with NAT – will be able to ping the host, but this time it will appear to the host like another external system. Therefore, you might need to adjust your firewall settings on the host. If your Windows firewall is enabled, by default it will block most incoming connections, so you will not receive a reply to your ping:
In your host’s firewall logs, it will show that all ICMP (ping) packets have been dropped (if in doubt, check out how to set up firewall logging). This means, the connection is theoretically possible, and the packets reach the system, just the firewall is not allowing them:
2020-04-19 16:36:48 DROP ICMP 192.168.178.30 192.168.178.22 - - 84 - - - - 8 0 - RECEIVE
2020-04-19 16:36:49 DROP ICMP 192.168.178.30 192.168.178.22 - - 84 - - - - 8 0 - RECEIVE
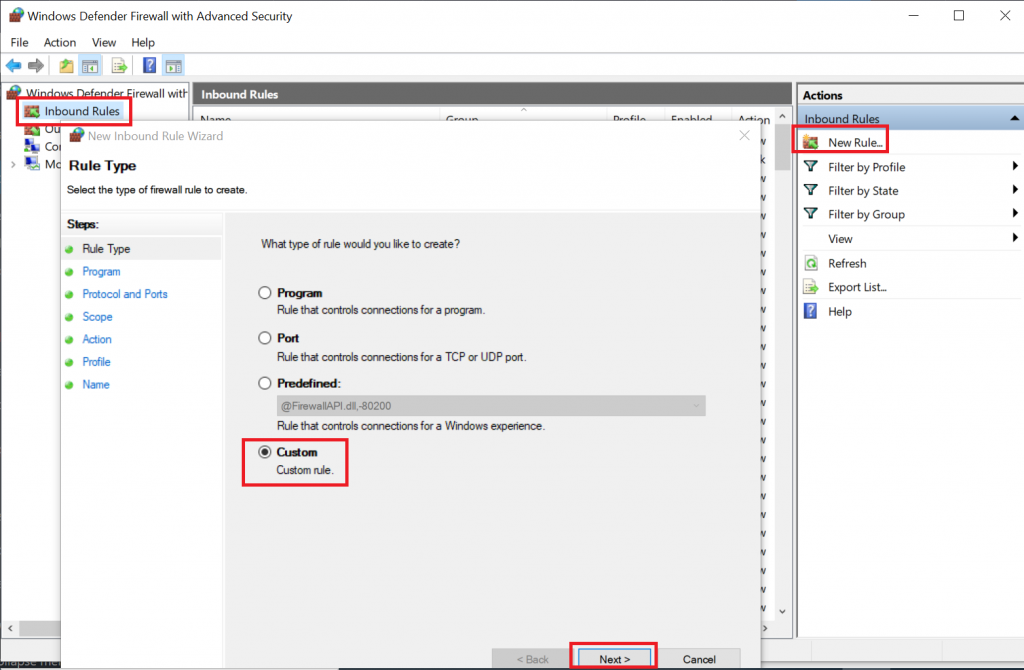
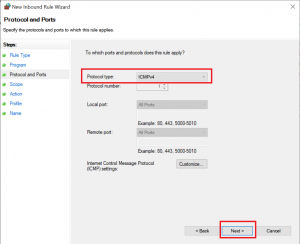
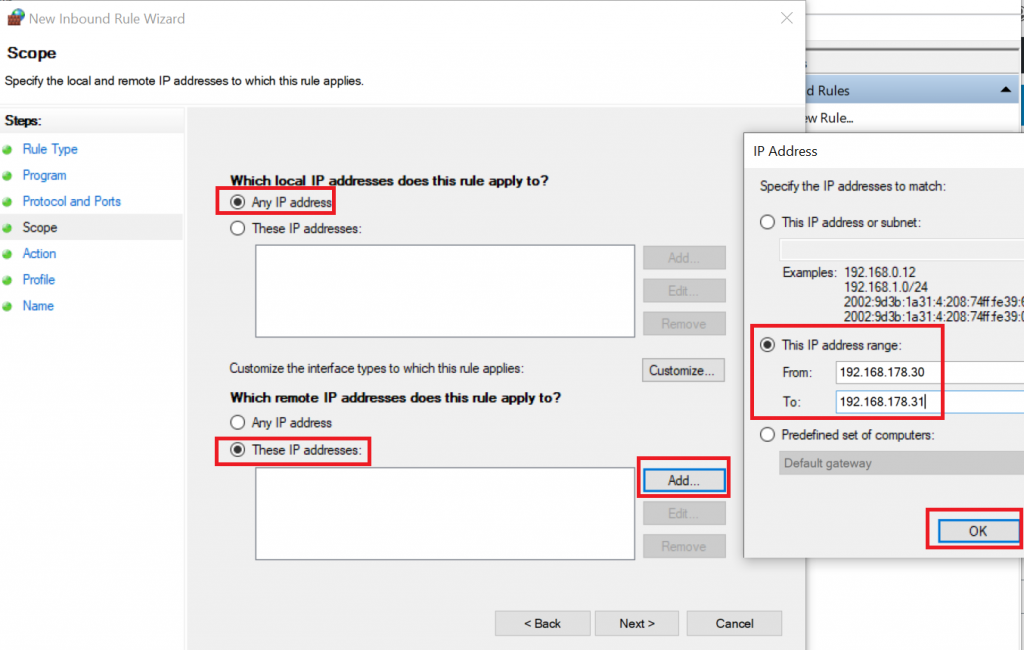
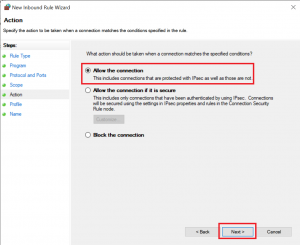
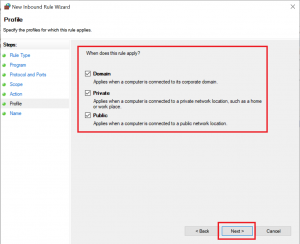
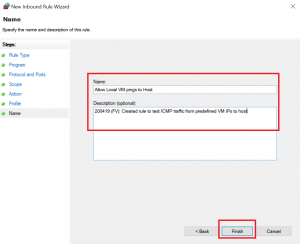
2020-04-19 16:36:50 DROP ICMP 192.168.178.30 192.168.178.22 - - 84 - - - - 8 0 - RECEIVEIf you want to allow traffic, you should set up your firewall rules as restrictive as possible, so for this example I set up a rule for ICMP traffic from the two VMs to the host:
Now, you will be able to ping your host from the VM:
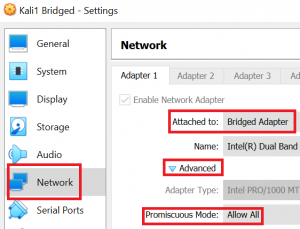
As I said in the intro to this scheme, bridging is great if you want to sniff all traffic between host and VM and the external network. Since bridged VMs share the physical adapter with the host, they can even see communication between the host and other networks (e.g. the internet). The only prerequisite is that you need to allow promiscuous mode in the VirtualBox settings:
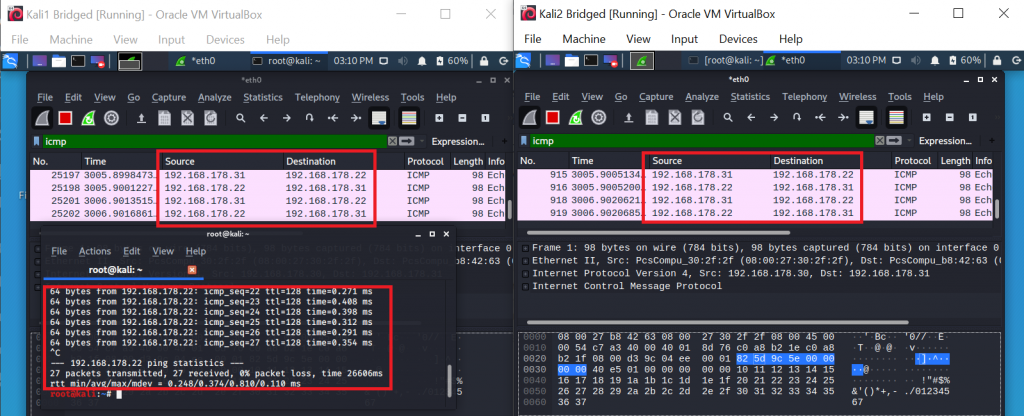
When you now let VM 1 ping your host or vice versa and let Wireshark run you on both VMs, you will see that traffic between VM 1 and host also on VM 2. It might make sense to specifically filter for ICMP traffic, because otherwise we would also see all traffic from host and VMs to the internet – in bridged mode with promiscuous mode allowed we can see it all.
I would like to mention that I had some trouble with getting Wireshark to sniff packets from the VM on the host. Not seeing traffic from your VM to the internet is understandable, because in bridged mode, your VM will bypass the host’s network stack on which Wireshark would be listening. However, I also could not capture packets directed to the host itself – sometimes it worked, sometimes not. I therefore assume, that there are configuration issues to be solved, but my general advise is therefore to capture on the VM where it was consistently working for me. Apart from that, you can also let VirtualBox itself do the packet capturing for VM traffic.
Host-Only Adapter – For local lab
Use it when: You do not need access to the world “behind” your host system (i.e. no internet access etc.), but you simply want to perform some tests between host and your VM(s).
The host-only adapter is easily described in a few words: Virtual machines and host will be able to communicate with each other in all directions. Outside of this “host-only network”, no connections will be available. This is great if you want to avoid that systems in your lab access the internet, and to protect your lab from any further access.
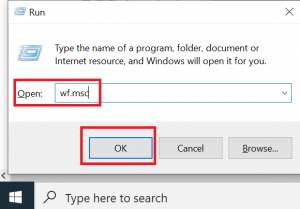
In order to build this host-only network, VirtualBox installs a virtual adapter called “VirtualBox Host-Only Network”, which acts as switch. You can see it when you run ipconfig on your host system:
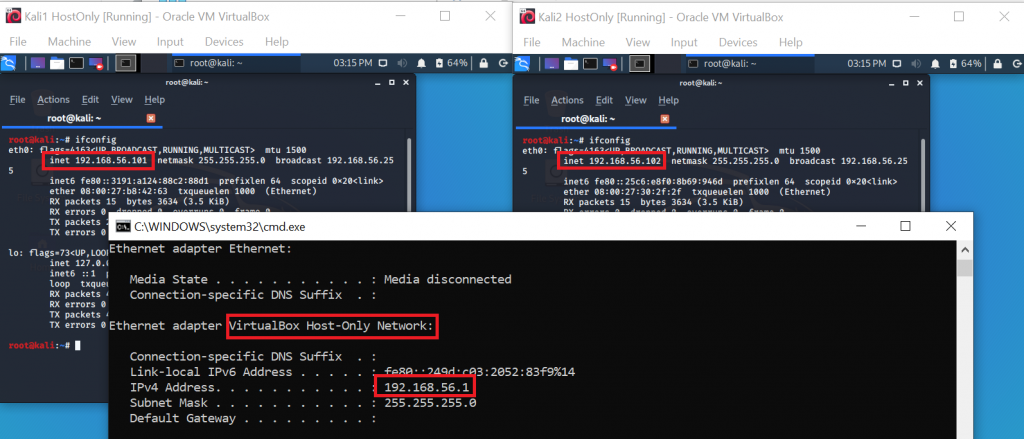
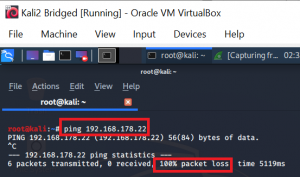
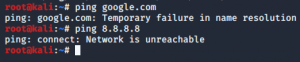
As you can see in the screenshot above, VMs and the host are in the same subnet 192.168.56.0/24. When you try to ping your host either via the WiFi adapter’s IP, or via the VirtualBox adapter’s IP, you will receive errors (unreachable / 100% packet loss) in both cases:

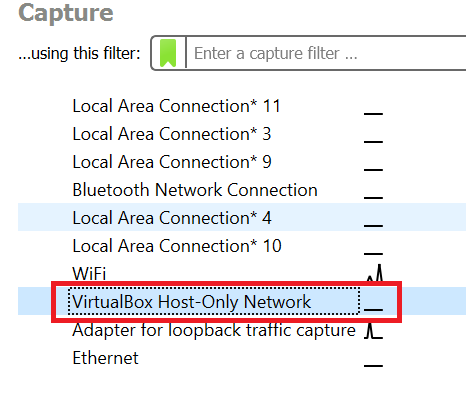
Wait, didn’t you say VM’s in a host-only network will be able to communicate with the host? Why does ping not work? Well, to analyze it, let’s start up Wireshark again. Since we are now communicating with the VirtualBox adapter and not the WiFi adapter, we need to select the respective interface in Wireshark:
If we now run ping from our VM (192.168.56.102) we can see incoming ICMP requests to our host (192.168.56.1), but with the remark “no response found”:

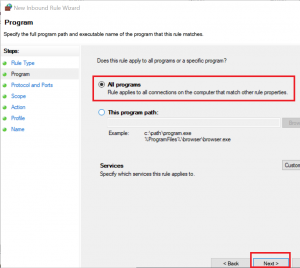
This reminds us of something from the bridged adapter, doesn’t it? Firewall maybe? Right – we have to allow pings on our host’s firewall. Even if you set up the rule as described in the paragraph for bridged adapter, this rule will not allow pings in your current setup, because your VM is now in a different subnet. Hence, you will need to add the IPs of your VMs with host-only adapter to to that same rule. The steps are identical to the description above, just instead of 192.168.178.30-31 you will now additionally allow 192.168.56.101-102 (in my case – it might be different for you). Luckily, in the default setup, VirtualBox will reuse the same IPs for the same VMs, so that you will not have to reconfigure your firewall rules after each VM restart.
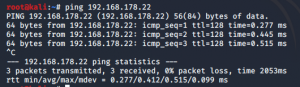
So, if you set up the firewall rule on your host properly, you will now be able to ping the machine…
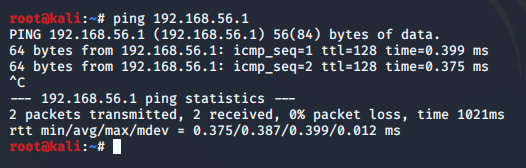
… and also see the responses in Wireshark:

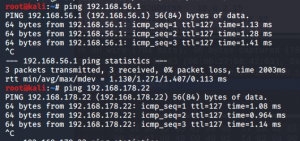
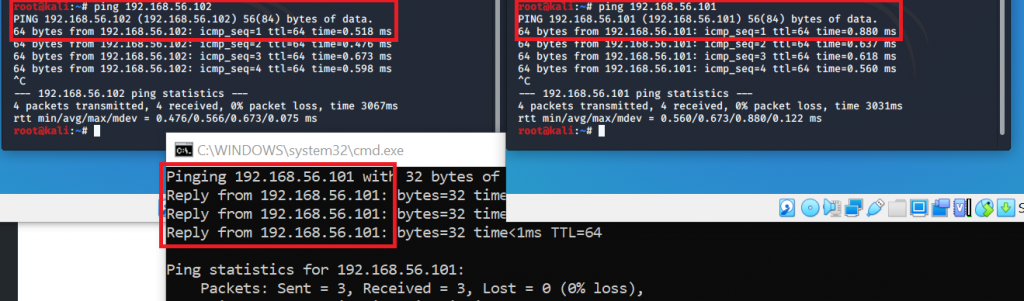
As I said in the description for this scheme, all VMs and the host will be able to communicate with each other, as you can also see from the “ping party” in the screenshot below:
However, the VMs will not be able to access the internet or any other system outside of your host (as you might have guessed from the name “host-only adapter”…):
By the way, don’t be taken in by the idea that listening on the host-only adapter from your host would simply offer you the full picture, i.e. all traffic including the one between VMs. You will not see it.
Why?
The reason is that the adapter acts as switch in your network, so it will only receive traffic either directly sent to that interface (our ping from before), or broadcast traffic. You will not see traffic sent between the VMs.
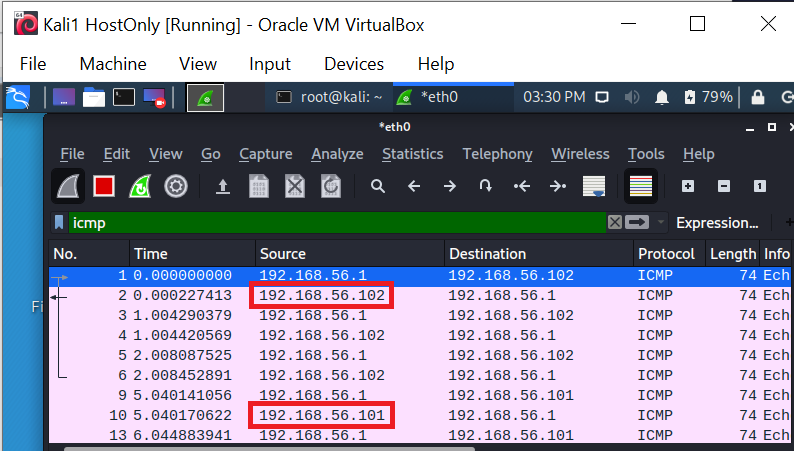
Therefore, I recommend the same for host-only as I did for the bridged adapter setup: Perform your sniffing in one of your VMs, with the adapter set to “Promiscuous – Allow All” (as described above). In the screenshot below you can see a capture on the VM – it is showing communication from VM 1 (192.168.56.101) to the host (192.168.56.1) and from VM 2 (192.168.56.102) to the host – just as you would expect in promiscuous mode:
On to the last schemes that I will describe…
Internal Network – For malware analysis
This scheme is the last one I would like to present, because usually among all the avilable options, most problems can be sensibly solved with one of the four presented schemes. Having said that, please do not hesitate to do further research on the remaining schemes which obviously also have their legitimate use cases.
Use it when: You want to have maximum isolation and therefore sacrifice convenience for security. This setup is the right one for your malware analysis endeavours. Please be aware that nevertheless it is never 100% safe to run malware on your computer and it is possible for malware to exploit hypervisor vulnerabilities to escape the virtual machine and attack your host system.
In an internal network, your VMs will be able to communicate among each other, but neither with the host, nor with any other system (i.e. not with the internet, etc.). Communication among VMs is also only possible, if they are on the same internal network, i.e. if you provided the same name in the network configuration:
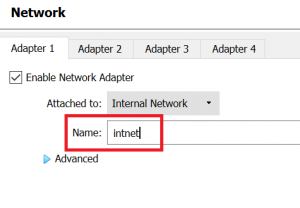
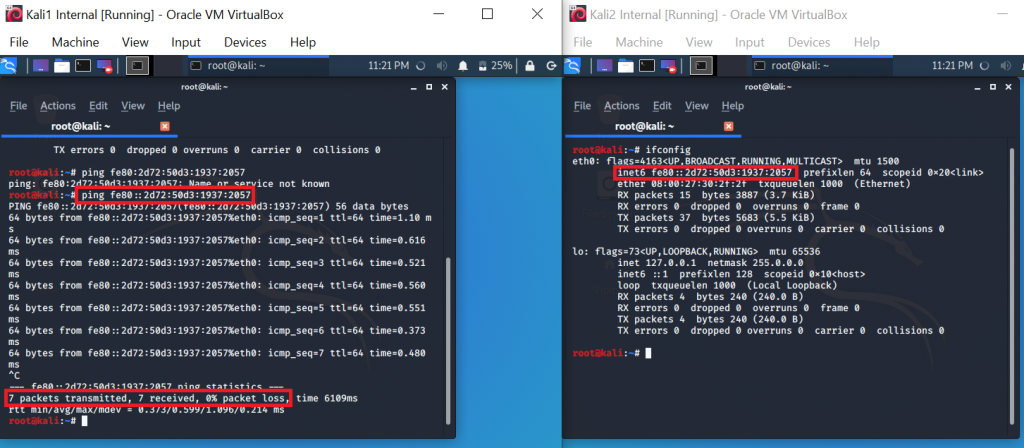
If both your VMs are on “intnet”, they will be able to communicate, if one is in “intnet” and the other one in let’s say “intnet2”, communication will not work. Also please do not get distracted by the message “Disconnected” and the fact that you might only have an IPv6:

The “disconnected” message just indicates that you are not connected to WiFi, but this host will be able to communicate with other VMs:
I would like to note however that also in this setup I sometimes had glitches, for example after a few VM restarts, networking would fail. This problem even persisted after I had shut down and restarted all VMs from that internal network. Only a complete restart of my host resolved the issue…
One last remark on using the internal network scheme for malware analysis: For such a high security setup, you should also make sure that you disable any further interaction between your host and the VM, e.g. disable shared folders and shared clipboard.
By the way, if you know what you are doing and you make sure to disable network access, you can also use Windows 10’s new sandboxing feature to analyse malware.
I hope that this post brought some clarity on how to choose your networking scheme for a safe and convenient VM experience. If you are now eager to set up your malware analysis lab, I recommend to go on with this excellent tutorial.
Very nice explanation.
Thanks.
Still you could also go through the others … !?!
Hi N.M.,
Thank you for your feedback. I currently do not have the resources to go through the other modes in such detail, but Oracle itself also has quite a good overview here: https://www.virtualbox.org/manual/ch06.html . In Chapter 6.02 there is also a table that shows the different capabilities.
And: Playing around with the different modes while sniffing the network traffic is also a good exercise and helps to understand the different modes even better 🙂
Cheers,
Fabian
Very well explained, Thank you.
Hi Christopher,
Thank you very much for the feedback, that’s very motivating!
All the best in your VM endeavours and stay safe!
Cheers,
Fabian
amazing article bro…Really appreciate the effort you took
Hi Kamal,
Thank you for taking the time to leave your feedback. I’m happy that it helped 🙂
Cheers,
Fabian
That is one of the most brilliant explaination that I have ever come across on the topic of virtualbox networking modes. I too faced confusion most of the time due to the modes and the settings in the VMs. This cleared everything. Thanks for this post.
I only have a slight confusion in this statement, where you mentioned – “To other systems, your VM’s traffic will just look like the one coming directly from your host (i.e. same MAC address and IP) This can also be useful if the network you want to connect to is limited to certain MAC addresses.” The problem is I am not able to visualize this statement in my mind like what you have explained about everything else in this post.
What I have understood from your statement is this:- If any other systems (systems present outside your network like on the external network or internet) try to open wireshark and check the traffic for all the VM’s that are present in your network (ex: if all the VM’s try to ping the external host at the same time), then for that external system all the VM’s traffic will be seen as originating from a single Public IP address i.e., the IP address of the Host from the Internal Network. That is what NAT says about the IP translation. And for the MAC address part, since all the VM’s have will be having only one physical adapter in real time i.e., the internal Host wifi or ethernet adapter, then it means that both the IP address and the MAC address will be same as seen from the network traffic coming from all the VM’s.
Please let me know if I understood it correctly, if not, then could you please clear this part through an example ?
Hi Akansh,
Thank you for your question.
My statement refers to the same local network (for example in your house where all devices are connected to the same router): Depending on the VM setup, your router or someone else in your local network might either see:
1) IP & MAC address of your host computer AND another IP address & MAC address of your VM
2) IP & MAC address only of your host computer, because the VM is directly accessing the same interface and won’t have its own IP or MAC.
Outside of your local network you are right that for most configurations it won’t be possible on the IP address alone to “see” the different devices in your home network because as you said, NAT translates these local IPs to – usually one shared – public IP.
By the way: MAC addresses won’t be (directly) visible outside of your local network / beyond your local subnet anyway, because MAC addresses are used in layer 2 of the ISO OSI model and work with ARP (Address Resolution Protocol); once you go out into the internet using the Internet Protocol (IP), you are on layer 3 and beyond and MAC addresses are not present anymore. You can find further explanations on this here: https://superuser.com/questions/114110/is-your-mac-address-revealed-when-you-hit-up-a-website
I hope this made things a bit clearer, if not please let me know and I’ll try to respond faster than last time 😉
Cheers,
Fabian