In the previous post I explained how to set up your Alfa WiFi adapter to perform security tests on your wireless network.
While I was looking up some things for the aircrack-ng suite, I realized that most tutorials on how to get started with cracking wireless encryption seem to be quite complicated – or they lack essential information.
Actually, there’s really not a lot you need to do to get started. Therefore, I thought to write down the few steps which you actually need. You will see, it’s really easy, but I will also give some tips on what to do if things go awry. What you will also realize is that using WPA2 together with a strong password is an effective protection against such attacks.
First, make sure that your WiFi adapter is working properly with Kali. I explained this before with a specific example.
Next, when you have booted up your Kali Linux, you might want to kill processes which could interfere with your tests. Aircrack-ng suggests to run the following command:
airmon-ng check kill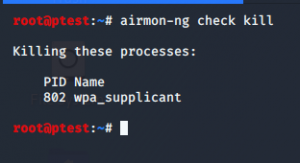
However, in my tests I usually did not have problems even if I did not run that command. Hence, you can basically immediately start with putting your NIC into monitor mode:
airmon-ng start wlan0
Note: Instead of wlan0 you might need to user another interface. You can check the right value using iwconfig.
Next, we want to get an overview on wireless networks in our area:
airodump-ng wlan0This might show you a list of access points and connected devices. However, it might also show simply a lot of “not associated” messages or a completely empty list. This can actually happen quite frequently – to be honest, there a many components (both hardware and software) that can fail in the process, so be patient and ready to perform some steps several times. If you do run into issues at this or some other point, I recommend disconnecting the USB NIC from your Kali VM via Devices > USB > *Name of your NIC*:
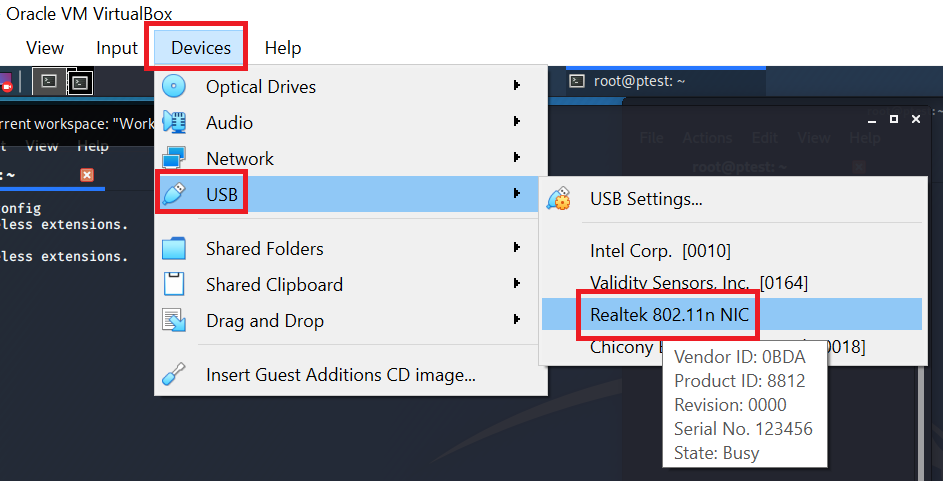
You can then immediately connect it again, using the same menu item (Devices > USB > *Name of your NIC*). Linux will still need to mount the device, therefore run:
lsusbIn case you killed problematic processes (with the check kill command described above), you will want to restart the network manager service which will make sure your NIC will work properly:
systemctl start network-managerNow your NIC should show up again when running iwconfig. If you want, you can then disable again network-manager (with systemctl stop or the check kill command), but as I said, I usually get along fine with the manager running.
When everything is working (hopefully without having to do the previously described troubleshooting), you should see a long list of access points and connected devices:
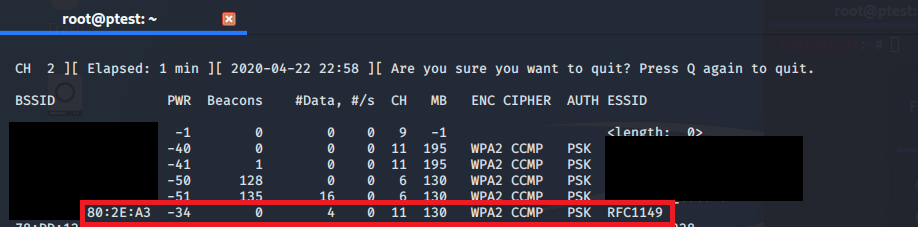
By the way, as you can see in the screenshot above, not all networks will have a proper name, but sometimes you will see something like <length: XYZ>. This means that the SSID of the network is hidden. You can either wait until a device connects with that network and reveal the SSID in the process, or you can use a tool like mdk3 which is shipped with your Kali Linux.
The network we are interested in is called RFC1149. You can see that it is sending on channel 11 with encryption WPA2. You can also see the BSSID, which usually is the MAC of the access point. For your further tests, you only will need to remember the BSSID and the corresponding channel. Since you are already done with the “general” airodump, you can stop it by pressing ‘q’ twice. This also has the advantage that you can easily select the BSSID – you probably do not want to type all of it, right?
For the next step, it is a good idea to open another terminal, so that the data you just captured with airodump remains visible for later usage. In our new terminal window, we will now use airodump to focus on our selected network. This is necessary because our WiFi adapter can only receive data on one channel at a time. For a list of available networks, it simply cycles through all channels in intervals of around one second. Now that we identified our target network, we of course want to have a full capture and therefore need to tell our NIC to stay on one channel. Since we are only interested in one network and not in all networks on that channel, we also indicate the BSSID:
airodump-ng wlan0 -c *write your channel here* --bssid *paste here the BSSID of your network* -w checking-rfc1149So, as you can see, you only need to put channel and BSSID and airodump starts listening. It will write the capture into several files having the name “checking-rfc1149”, each with a different extension and for different usage. Again, airodump might crash from time to time, so you will probably need to run this command more than once. To do this, just use the arrow up key in your terminal – no need to rewrite all of it. Airodump will automatically add an increasing number to the files each time to restart it. This means, even if you indicate again that your files should be named “checking-rfc1149”, your files will not be overwritten, but simply have a trailing “-01”, “-02” and so forth.
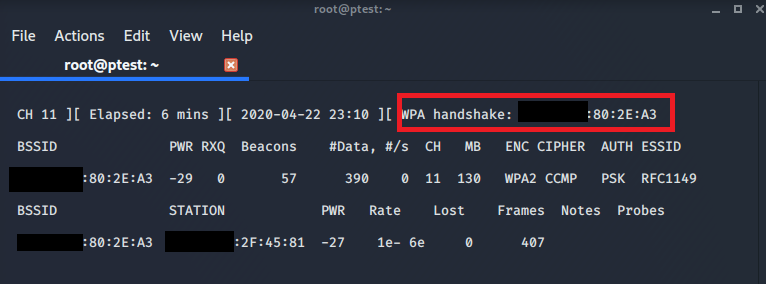
If everything is working, it should look like this:

Be aware that even if capturing is working at the beginning, it might stop do so shortly after. A small message in the upper right reveals that there are issues:
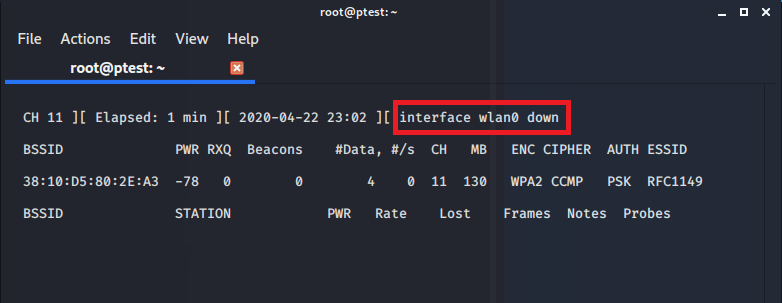
If this happens, usually you will not need to disconnect your whole USB NIC (as described above), but it should suffice to end airodump (pressing ‘q’ twice) and restarting it again with the same parameters.
What we need to do next depends on the encryption algorithm used by our target network. Since RFC1149 uses WPA2 (as we saw in the list above), I will first explain how to attack that. Afterwards I will show how to handle (insecure) WEP networks.
So, first WPA, or WPA2, respectively. The good news: WPA requires less steps to be performed with aircrack compared to WEP. The bad news: The chances to crack WPA(2) are considerably lower than WEP.
For WPA we basically now only have to wait until a client joins our target network. This is necessary because only with the information of that initial handshake between new device and access point will we be able to potentially crack the WiFi password. Since patience is not our biggest strength, we will use a trick to accelerate things: We will deauthenticate – i.e. disconnect – all connected clients from our target network. To do so is very simple and just requires sending a few control packets which even in WPA2 are sent without encryption.
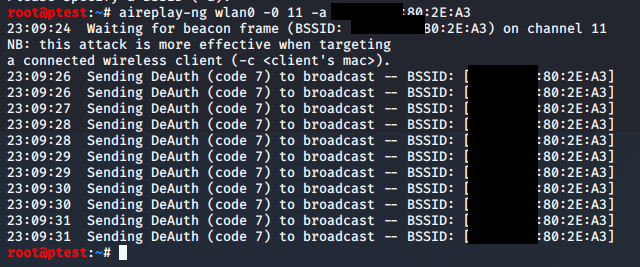
Of course, the forcibly deauthenticated devices want to be connected, so they immediately start to reconnect. Guess what? We will get what we came for: The authentication handshakes. I recommend you perform this attack in yet another terminal – i.e. a third window, so that you can keep an eye on your still running airodump instance:
aireplay-ng wlan0 -0 4 -a *paste here the BSSID of your network*Instead of the parameter ‘-0’ you can also use the literal ‘–deauth’. I suggest running aireplay –help for a list of all available commands. Also note that the number ‘4’ in the example above stands for the number of deauthentication requests to be sent out. You can also choose a lower or higher number. A value of ‘0’ means that you will be sending continuously.
This attack might work immediately, but then again you might well get a message that your BSSID is not available:

If this is the case, just try it again. It might be necessary to run this command four or five times until it works, depending on your target network and the connection quality you have to it. A successful attack will look like this:
The airodump instance which you still have running in parallel will show that it found a handshake as soon as some device reconnected to the network. This should be happening within seconds, provided that there are devices that try to connect.
We are now done with the online part of our attack and you can stop airodump by pressing ‘q’ twice. The resulting packet capture files will be stored in your current folder. When you run ls to show all files and folders in the current directory, it should look like this:

Note that there are files with the suffix ‘-01’ and others ending in ‘-02’. This is because I had to run airodump-ng twice after I had trouble during the first capture. For cracking the password, I will use the second capture.
WPA2 – as far as we know today – is a secure protocol. This means there is no mathematical trick you could use to quickly retrieve the password. The only way will be password guessing. Obviously, you will not do this manually, one password after the other, but in an automated fashion.
There are long password lists that can be used for performing such password cracking attacks. Kali ships with a very famous list called “RockYou” (located in /usr/share/wordlists/rockyou.txt.gz). This list was retrieved during a hack of the company “RockYou”, which – against any advice – saved user passwords in cleartext. When I browsed the list I saw a lot of English and Spanish passwords. For other languages you might want for other word lists.
Also keep in mind that many people will never change the password of their router. While these initially set passwords might appear secure – very long with random numbers and characters – they actually have weaknesses: If you understand the logic (or even the algorithm) with which such keys are generated, you can of course create your own list of possible keys. A popular tool to do exactly this is called crunch. It is already installed in your Kali Linux. Apart from that you might want to have a look at password creators that come already configured for one specific hardware vendor. For passwords used in the very popular AVM FritzBox routers you could have a look at GitHub.
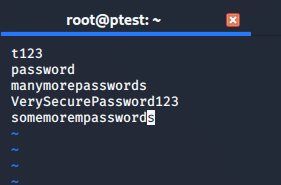
For the sake of demonstration I quickly created my own list and called it “pwlist” (you can see it in the screenshot above). It contains just a handful of passwords, because for our test we do not want to wait years to have the password cracked:
The creators of the aircrack suite are aware of the challenges that come along with cracking WPA encryption, so aircrack supports “pause / resume”, e.g. if you want to turn off your computer from time to time. You can also use distributed computing to spread the hard work of password cracking on multiple machines using dcrack.
For our simple test scenario we only work with one list on our local copmuter. We will now use that list and try each password in it against our packet capture file:
aircrack-ng checking-rfc1149-02.cap -w pwlistFor this test I ensured that the actual password is contained in the file:
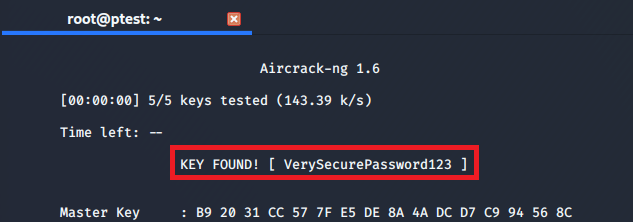
You can then connect to the network, set up a rouge access point (evil twin) to go phishing or decrypt the already captured data using airdecap-ng.
What this test also shows is that using a long password that is different from the initially set key is important. Make sure that your password does not appear in a dictionary or password list. While this will make your password technically quite secure, other techniques like social engineering might still be effective for attackers.
Now, if your network uses WEP – the predecessor of WPA – the story is completely different. For WEP, it does not matter how good your password is – the algorithm itself has some serious flaws and can therefore be cracked in a very short time. Luckily (not for the attackers 😉 ), in home environments you will almost never see WEP encryption being used. In older hardware that was not patched – for example in department stores or supermarkets – things might be different. Anyway, my router does not even allow me to set WEP anymore, so for attacking WEP I will just show you the steps you would need, without further screenshots.
The first steps will be all the same as for WPA: Start airodump-ng without parameters to find your target network. Then use airdump-ng again to capture one specific channel (and BSSID). For WPA we now used aireplay-ng to send deauthentication requests, but for WEP it will be different now.
While we let airodump-ng let running, in a separate window we will repeatedly send fake authentication requests to the AP:
aireplay-ng wlan0 -1 15 -a *paste here the BSSID of your network*In the example above, the ’15’ indicates that one request will be sent our every 15 seconds. The aireplay-ng wiki has some suggestions on how to set that value for different scenarios.
In yet another window we will now be waiting for an ARP request which we will later use to resend it to the client in masses:
aireplay-ng wlan0 -3 -b *paste here the BSSID of your network*Unfortunately, in existing connections we will usually not see ARP requests, so we might need to wait for quite a long time. Unless… yep – we use again deauthentication to speed things up. This will require yet another window:
aireplay-ng wlan0 -0 4 -a *paste here the BSSID of your network*Since a deauthentication request also empties the client’s ARP cache, your listening aireplay-ng instance should quickly see a new ARP request and use that once to send out a massive number of requests to the access point. Together with this you will see how the ‘#DATA’ value in your listening airodump-ng instance will quickly increase. Therefore it is important that you run all these commands in separate windows: One is listening for traffic, in another you are forcing clients to create some useful packets and yet in another window you are multiplying these few observed packets to create huge amounts of traffic. Thanks to this ARP re-injection you are basically creating all necessary data by yourself to crack WEP in less than a minute.
For WEP the only thing that matters is that you have collected enough data. You will not need to resort to time-intensive password cracking. Therefore, just run aircrack without indicating a dictionary:
aircrack-ng checking-rfc1149-02.capIf you collected enough data, a “KEY FOUND!” message will appear. If you did not wait long enough and tried before having collected enough data, you will see an error “Failed.” Then you should try again, waiting a bit longer to collect more packets.
So, what does all this tell us? Use WPA2 with a good password. Never use WEP. And of course, only perform these tests on networks that you own or for which you have the permission to do tests.