Windows 10 has a very useful implementation of OpenSSH to build up secure tunnels to remote systems. Compared to a tool like Putty, using the “ssh” command has some advantages, for example:
- Work with built-in tools (no need for Putty or others)
- Remote commands can be executed, i.e. you can open several tunnels after another for which otherwise you might need to open several instances of your remote connection program (like Putty)
- With the right configuration, you just need to type “ssh *myserver*” and OpenSSH does the rest – minimum interaction needed
- Dynamic port forwarding allows local applications to access otherwise inaccessible remote content without the need for reconfiguration (as long as you make sure they can handle SOCKS)
One thing that still requires interaction is when ssh asks you to enter the password for your private key. Even if you built up a neat SSH config as I will explain later, the ssh client will still ask you for a password for every single connection if your private key is password protected (what it hopefully is):
PS C:\Users\YourUser> ssh MyServer
Enter passphrase for key 'C:\Users\YourUser/.ssh/id_rsa':
I will show you how you can store your private key in the OpenSSH Authentication Agent, so that you will not need to enter the password each time you build up an SSH tunnel. We will also briefly talk about agent forwarding, so that even on remote machines no password will be needed. But first let’s talk about the general SSH configuration. But first let’s see what is possible with the current implementation of OpenSSH in Windows 10 – and what not.
Setting up your SSH config
The example above assumes that you created the folder C:\Users\*YourUser*\.ssh and a file “config” that contains something like the following code:
Host MyServer
    HostName IP.Of.Your.Server
    User YourUserName
    Port 22
If you want, you can use port forwarding so that you can work from your local workstation with the remote system:
Host MyServer
    HostName IP.Of.Your.Server
    User YourUserName
    Port 22
    LocalForward 9999 localhost:9999
This means, that if you browse to http://localhost:9999 on your local system, you can see data that the remote webserver is theoretically only providing locally for its own localhost. Of course, local and remote port which are both 9999 in the current example can be different. You can also forward multiple ports. If you have a proxy server running your remote host, you could forward that port and set up proxy-aware applications (for example your web browser) to use that proxy on that port.
ProxyJump – Currently not working
As mentioned in the list of advantages above, you can even execute a remote command after you established the tunnel, for example to built up another tunnel from the remote system to yet another system. OpenSSH therefore distinguishes between to methods: ProxyJump and ProxyCommand. If you simply want to jump from the first remote host to another remote host – which is most likely the case if your final system is only reachable via an intermediate bastion host – you could use ProxyJump. Unfortunately, as of now due to a bug in the Windows implementation of OpenSSH, this does not work. It apparently will be fixed in July 2020:
Host MyServer
    HostName IP.Of.Your.Server
    User YourTargetSystemUser
    Port 22
    LocalForward 9999 localhost:9999
    ProxyJump YourProxyUser@IP.Of.Your.Proxy:22 # This does not work right now on Windows, but will probably be fixed in July 2020
As soon as it will work you should be able to get it working even without a config file, by using the parameter “-J” instead:
ssh -J YourProxyUser@IP.Of.Your.Proxy:22 YourTargetSystemUser@IP.Of.Your.Server # This should work with newer versions of OpenSSH in Windows after July 2020This should log you in with “YourProxyUser” on IP.Of.Your.Proxy and from there you will be logged in to IP.Of.Your.Server with “YourTargetSystemUser”. Obviously, IP.Of.Your.Server needs to be reachable from the proxy/bastion. If DNS is working, you can of course also use a hostname instead of an IP address.
ProxyCommand – The flexible alternative
While ProxyJump is not working and as a more flexible alternative, you can also execute any command of your choice on the proxy using “ProxyCommand”. If you are working without a config file, you can use the parameter “-O” for ProxyCommand:
ssh -o ProxyCommand="ssh.exe -W %h:%p YourProxyUser@IP.Of.Your.Proxy:22" YourTargetSystemUser@IP.Of.Your.ServerNote that you cannot use ProxyCommand and ProxyJump in the same host configuration. For ProxyCommand, you can use some wildcards, as the manpage explains:
‘%h’ will be substituted by the host name to connect, ‘%p’ by the port, and ‘%r’ by the remote user name. The command can be basically anything, and should read from its standard input and write to its standard output. It should eventually connect an sshd server running on some machine, or execute sshd -i somewhere.
Actually, ProxyJump seems to be just a “shortcut” to use ProxyCommand: If you do use ProxyJump and set ssh to verbose output, you can see how it translates ProxyJump to ProxyCommand:
PS C:\Users\YourUser> ssh MyServer -v
[...]
debug1: Setting implicit ProxyCommand from ProxyJump: ssh -l YourProxyUser -p 22 -v -W '[%h]:%p' IP.Of.Your.Proxy
debug1: Executing proxy command: exec ssh -l YourProxyUser -p 22 -v -W '[IP.Of.Your.Server]:22' IP.Of.Your.Proxy
Here you can also see the reason why it is not working – it is translated to “ssh”, but in current implementations of OpenSSH in Windows you need to indicate the full extension, i.e. “ProxyCommand ssh.exe”. This is still better than having to indicate the full path as it was required before due to another bug. So, let’s hope this will be fixed soon – or if it bugs you (haha), you can fix it manually.
Of course, you can also execute any other command apart from ssh, for example netcat, but also something like corkscrew to tunnel SSH through http proxies. If you want to learn more about the many things you can do with it, there are excellent tutorials on what is possible with ProxyCommand.
The important parameter for ProxyCommand is “-W”, which the manpage (for Linux) explains as follows:
-W host:port
Requests that standard input and output on the client be forwarded to host on port over the secure channel. Implies -N, -T, ExitOnForwardFailure and ClearAllForwardings and works with Protocol version 2 only.
We will have another look on how this works in the next section.
Chained Configurations
You can “cross-reference” within your SSH config. So let’s assume you have something like the following setup:
Host MyServer
    HostName IP.Of.Your.Server
    User YourTargetSystemUser
    Port 22
    ProxyCommand ssh.exe -W %h:%p Bastion # on Windows we need to add the ".exe"

Host Bastion
    HostName IP.Of.Your.Proxy
    User YourProxyUser
    Port 22 # could of course also be any other port
Now type:
ssh MyServerWhat will happen is that your local ssh client will take the “MyServer” configuration and see the line “ProxyCommand”. This tells the client that prior to executing the connection described in “MyServer”, it first will have to execute a command on an intermediary.
In the example above we are telling ssh that when it establishes a connection to IP.Of.Your.Server, it shall first run SSH on our local Windows 10 system, using the connection information provided in “Bastion”.
What I would like to note is that you can chain multiple times, but in practice I realized that things can easily break then. For work I’m using a fourfold jump, i.e. from my workstations over server 1, server 2, server 3 to server 4. This does work, but when I then try to use a service on server 3 – where port forwarding should allow me to do it – sometimes the connection cannot be established. An easy workaround is to build up a second connection that only jumps up to server 3 and ends there.
You can get a better understanding on how chaining works when you run ssh in verbose mode, i.e.:
ssh -v MyServerYou will then see the line:
debug1: Executing proxy command: exec ssh.exe -W IP.Of.Your.Server:22 BastionThis means, on that local Windows 10, it shall take the connection information from “Bastion” (%h = host “IP.Of.Your.Server”, %p = port “22”). Afterwards, it will forward the “MyServer” configuration over the standard input/output on the bastion host.
Default Settings
One last remark on the SSH config file: If you call your host “*”, all settings written there will be used as default, but can be overwritten in the specific host definitions. You can write the host definitions before or after the “*” host and in any order.
Host *
     ForwardAgent no
There are other websites that explain all options that you can in the config file.
SSH Agent: Storing your key’s password
Normally, if you open a new ssh session, you will have to enter your private key’s password every single time. There are however ways how to prevent this. Obviously, you will need to decide by yourself if the gain in convenience is worth it to store your decrypted private key temporarily on your system, which theoretically can be accessed by malware.
Usually, other programs should not be able to access memory space of your ssh instance where you enter your password and where your private key is then decrypted. However, as soon as this instance ends (for example because you end the remote session), memory is freed up and your temporarily stored password-unprotected private key is gone. To make things a bit more persistent, a so-called ssh agent can run as a service and keep your password so that instances of ssh can ask the service for the required password. If you know Putty, you might already have worked with its ssh agent called “Pageant“. Obviously, it is not guaranteed that malicious software does not use the ssh agent’s services, hence you should have some trust in your system’s security posture. You should also not use this technique if somebody else with admin rights is working on your system, because they can read your key then.
The advantage of working with an ssh-agent is that you only will have to enter your private key’s password once and the service will keep it.
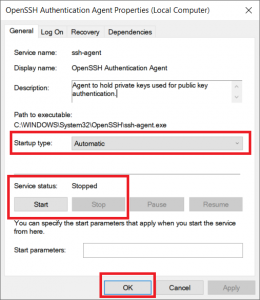
If you do want to use this convenient service, first you need to make sure that the authentication service is actually running: Press Win-R, type services.msc and look for “Open SSH Authentication Agent”. Make sure that the Startup type is on “Automatic”, and also don’t forget to start the service with “Start” if it was not running before. Then press OK to save the changes and close the window:
If you saved your private key with default path and name under *YourUserDirectory*\.ssh\rsa_id, you will not even have to provide any key name and just type:
ssh-addIf your key is named differently, type:
ssh-add /path/to/your/key/and_its_nameNow, you can simply add your private key, enter your password once and it will be stored for the duration of your Windows session. If for security reasons you only want to keep the key in the agent for a certain time, you can indicate the lifetime with the -t parameter, e.g. one hour would be:
ssh-add -t 1hTo verify which keys are currently stored in your agent, type:
ssh-add -LThis will return all keys that are currently held in memory for you by the agent. Oh, and if you created your key pair with Puttygen and therefore have to convert them to the OpenSSH format, just check out StackExchange.
Also here a quick note: For some reason, sessions sometimes seem to struggle to access the key from the agent and you will still have to enter your key manually again. Still figuring out what is the reason behind this…
Agent Forwarding: No password prompt anymore
The ssh agent ensures that for any further connection from your system to a remote system you will not need to enter your private key’s password anymore for the duration of the session. However, if you connect from your first remote system to another remote system and that system is asking for your private key as well, you will have to enter the password once more. Of course, you could store your private key on the first remote system and use an ssh agent there as well, but you should never copy your private key to any other system than your own. Moreover, your password for the private key would be readable on the remote machine if you typed it in there (it’s going through the SSH tunnel to the remote machine with encryption, but then goes out there to the standard output in unencrypted form).
SSH also has a solution for this: Agent forwarding allows remote systems to simply forward their key challenge to your local system – this even works across multiple hops and neither your private key, nor your password is ever transmitted. Nevertheless, only use agent forwarding with remote system you trust. Especially in enterprise environments, this option will often be disabled.
Note: I did not have a chance so far to try this out on Windows 10, so below is a description how it should work if OpenSSH is properly implemented.
To use agent forwarding, you have two possibilities: You can extend your SSH config (see above) with the following line:
ForwardAgent yesSome implementations of OpenSSH also allow to indicate forwarding as parameter, so when opening a connection – without the need for any config – you would simply type:
ssh -AFor some reason, the CLI parameter -A does not seem to be implemented for the Windows agent, though. You should also make sure that agent forwarding is actually supported and allowed by your target system. In the server config it needs to have this line:
AllowAgentForwarding yesFurther Reading
If you are not yet aware of them anyway, I recommend you to learn about the very useful possibilities that dynamic port forwarding brings.
I also recommend this site for an excellent overview on how key challenges – with and without agent forwarding work and another site for top 5 security recommendations.
PAM solutions might grant access to servers only temporarily and on-demand, which is an interesting concept that avoids to have orphaned keys lying around in the trusted keys folder.